
Are you preparing for your first trip out to sea, or do you finally want to fill this gap in your knowledge? Marine knots are often what intimidates people initially. Too many names, seemingly complicated movements, and the fear of doing it wrong. Yet, a few well-mastered knots are enough to navigate confidently in the vast majority of situations.
This guide is here to walk you through it step by step: we'll explore together why marine knots exist, how to recognize them, and most importantly, how to tie them and use them correctly. Without unnecessary jargon, without an endless list.
Why are marine knots so important?
On a boat, every action counts. A poorly secured mooring line, a vang that comes undone, a halyard that gives way at the wrong moment — the consequences can range from a minor incident to a truly dangerous situation.
Marine knots aren't just for tradition or aesthetics. They address very specific requirements:
Safety : securing loads, firmly securing a vessel, securing a crew member.
Reliability under load : a good marine knot tightens when pulled, and unties easily when needed.
Material compatibility : modern ropes (polyester, dyneema, kevlar) do not behave like old hemp ropes. Some knots can reduce a rope's strength by up to 50%, while others only reduce it by 10 to 15%.
The golden rule of boating : a marine knot should untie easily, even after being under load. If you have to cut the rope to get rid of it, it's not the right knot.
Major Knot Categories
Before diving into the details, it's helpful to understand that knots are grouped into categories based on their use:
- Stopper Knots : to prevent a rope from running through a block or pulley.
- Hitching Knots : to attach a rope to a fixed point (cleat, ring, mooring buoy).
- Bends : to join two ends together.Loop Knots : to create a fixed or running loop in a rope.
Here are the essential knots in each of these categories
1. The Figure-Eight Knot — the benchmark stopper knot

What it's used for: to prevent a rope from slipping through an eye, block, or pulley. It is invariably found at the end of a halyard or sheet.
Why it's essential: simple to tie, it doesn't jam in blocks even after being under strain, and it's easy to untie by twisting it between your fingers.
How to tie it:
1. Form a loop by passing the working end under the standing part.
2. Pass the working end over the standing part, then through the initial loop.
3. Tighten by pulling on both strands.
You get a characteristic 'figure 8' shape — hence its name. If your knot looks like a square knot or a simple knot, start over.
What not to do: use a simple knot (known as a 'granny knot') instead of a figure-eight knot. The former tightens under load and becomes almost impossible to untie.
2. The Clove Hitch — the quick and versatile fastening

What it's for: quickly attach a rope to a cylindrical support (cleat, mooring post, bowsprit, spreader).
Why it's essential: quick to tie and untie, it's easily adjustable in length. It's the knot you'll use when you need to moor in an emergency or adjust the position of an attachment point.
How to do it:
1. Pass the working end around the support.
2. Bring the working end back to cross over the standing part.
3. Pass the working end under itself, between the rope and the support.
4. Tighten.
There's an even quicker way to tie it by forming two loops that are slipped directly around the support — very useful when you need to be quick.
Its limitation: the clove hitch is not an absolutely secure knot. Under heavy and variable loads (pitching, rolling), it can loosen. For long-term mooring, it's better to secure it with a round turn and two half hitches.
3. The Round Turn and Two Half Hitches — the reliable mooring

What it's for: to securely moor a boat to a ring, cleat, or fixed structure for an extended period.
Why it's essential: it's one of the safest mooring knots. The load is distributed by the round turn (which absorbs friction), and the two half hitches secure it.
How to tie it:
1. Pass the working end around the support once or twice (the "round turn") — this is what takes the load.
2. Make a first half hitch: pass the working end under the standing part, then through the loop formed.
3. Repeat for the second half hitch in the same direction.
4. Snug up each half hitch well.
Tip: the two half hitches must be oriented in the same direction. If they go in opposite directions, you get a granny knot — unstable and less secure.
4. The Cleat Hitch — for cleats
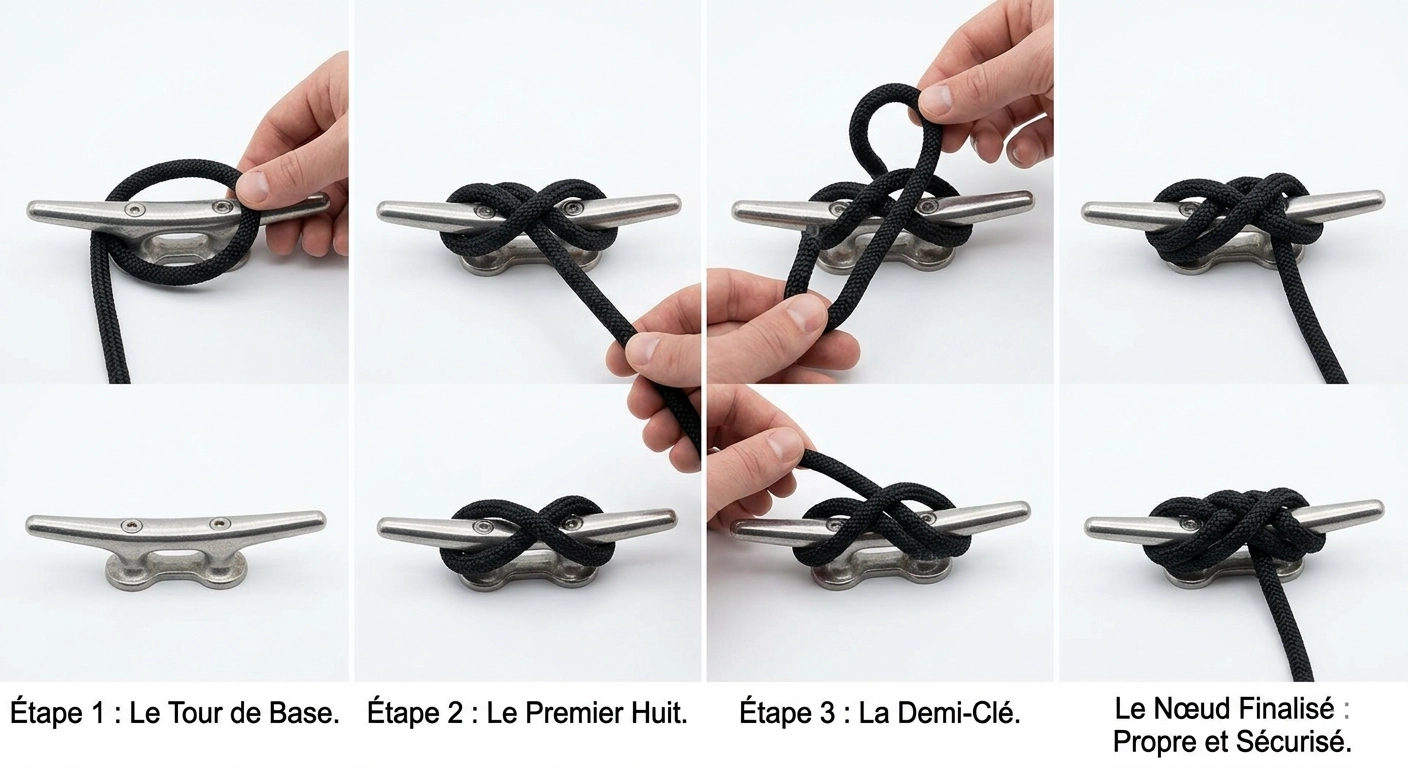
What it's for: to secure a sheet, halyard, or mooring line on a cleat (these two-horned fittings found everywhere on a sailboat or powerboat).
Why it's essential: it's the basic sailor's knot. You'll use it multiple times per outing.
How to tie it:
1. Start with a full turn around the base of the cleat.
2. Make a figure eight by crossing the line in an S-shape around the two horns (at least two turns).
3. Finish with a half hitch, forming a bight that you flip over and pass around a cleat horn.
What not to do: start directly with the figure-eight without making the base wrap. Without this wrap, the entire load rests on the final half hitch, which can fail.
Important: on deck cleats, especially for halyards, some sailors omit the final half hitch to allow for quick release in an emergency. Adapt as needed.
5. The Bowline Knot — The Essential Fixed Loop
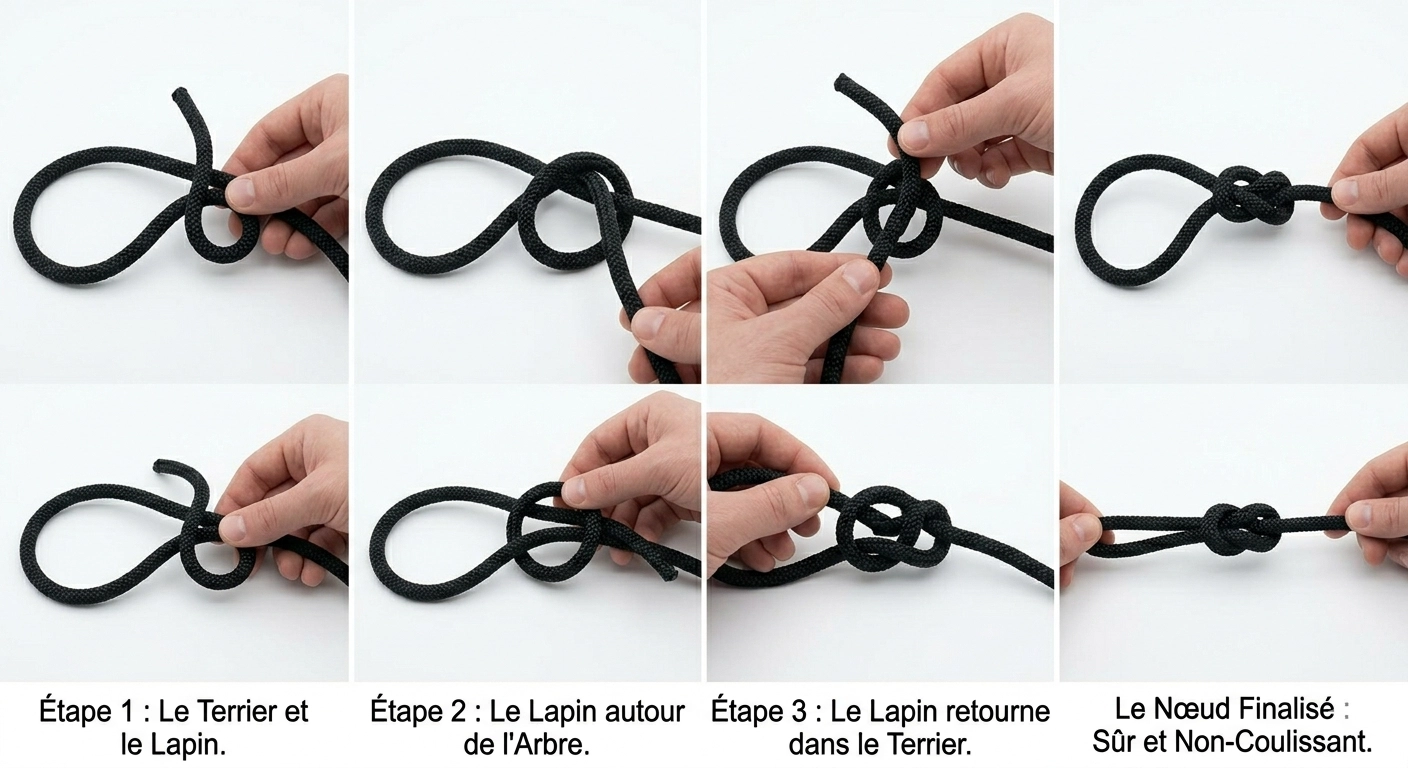
What it's for: to create a fixed, non-slipping loop at the end of a rope. It's used to pass through a thimble, attach to a buoy, create a mooring eye, or even form a makeshift safety harness.
Why it's essential: the bowline is probably the most well-known and useful marine knot. It doesn't tighten under load, unties easily, and retains good strength (about 60 to 70% of the rope's strength).
How to tie it (rabbit method):
1. Form a small loop on the standing part — this is the "burrow".
2. The working end comes out of this loop from underneath — this is the "rabbit coming out of the burrow".
3. The rabbit goes around the tree (the standing part), then dives back into the burrow.
4. Tighten by pulling on the standing part and the large loop.
This mnemonic method works very well for memorizing the steps. With a little practice, you can tie a bowline in a few seconds, even in the dark.
Its limitation: the bowline can loosen if there is no load for a period, and then the load is reapplied. In this case, a stopper knot can be added to the working end, against the large loop.
6. The Reef Knot (Square Knot) — for joining two ropes of the same diameter
%20%E2%80%94%20pour%20joindre%20deux%20cordages%20de%20me%CC%82me%20diame%CC%80tre.webp)
What it's used for: to join two ends of the same diameter. It is used to repair a rope, extend a halyard, or join two mooring lines.
How to tie it:
1. Cross the two working ends.
2. Pass the first working end under the other, then through the loop.
3. Repeat the process in the same direction with the second end.
4. Tighten by pulling on the two standing parts from one side and the two working ends from the other.
Beware of a common mistake: if the two passes are made in opposite directions, you get a 'granny knot' which unties easily or is very unreliable. Always check that both working ends exit on the same side.
Its limitation: the reef knot is not suitable for ropes of very different diameters. It tends to slip in such cases. In that case, prefer the double fisherman's bend or a splice.
7. The Double Fisherman's Bend — the secure joining knot

What it's used for: to join two ropes very reliably, especially elastic ropes or small-diameter ropes. It is the go-to joining knot for critical applications.
How to tie it:
1. Overlap the two ends to be joined, oriented in opposite directions.
2. Form a simple fisherman's knot around the second rope with the first end (two wraps + one pass), and tighten.
3. Repeat on the other side with the second end around the first rope.
4. Slide the two knots towards each other until they meet, and tighten firmly.
Why it's reliable: Unlike the square knot, the double fisherman's bend does not slip, even under variable loads or with slippery materials.
Its limitation: It is difficult to untie after being heavily loaded. It's best reserved for permanent connections, not for frequent adjustments.
8. The Bowline Knot (or Lark's Head Knot) — for rings and lifelines
%20%E2%80%94%20pour%20les%20anneaux%20et%20filie%CC%80res.webp)
What it's used for: To attach a rope to a ring, a lifeline, or a flat support, leaving a symmetrical loop on each side.
How to tie it:
1. Form a loop with the rope and pass it through the ring.
2. Pass both standing parts through this loop.
3. Tighten.
Its simplicity makes it a very handy temporary knot, especially for hanging a fender from a lifeline or attaching an accessory to a flat surface.
Common mistakes to avoid
Confusing the square knot with the granny knot. The difference is visible to the naked eye: in a correctly tied square knot, the two working ends exit on the same side. In the granny knot, they exit on opposite sides.
Tying a half hitch in the wrong direction. A poorly oriented half hitch can turn a reliable knot into an unstable one. Take the time to check the direction of each pass.
Using the wrong knot for the situation. The clove hitch is excellent for a quick tie-off, but insufficient for a long night at anchor. The bowline is ideal for creating a fixed loop, but useless if you just want a stopper knot.
Neglecting the finish. A poorly tightened knot or one with too short a working end can come undone. Always leave at least 10 to 15 cm of slack on the working end after the knot.
How to practice effectively?
You learn nautical knots with your hands, not your eyes. Here are some tips to progress quickly:
Start with just three knots: the figure-eight knot, the bowline, and the round turn and two half hitches. With these three, you'll handle the essentials.
Practice off the boat. A piece of rope in your pocket, and you can practice anywhere — on the train, while watching a movie, while you wait.
Recreate real-life conditions. Put yourself in situations that mimic being on a boat: wet hands, at night with a headlamp, wearing gloves.
Untying the knot is part of the exercise. If you struggle to untie what you've just tied, it's often a sign that you didn't tie the knot correctly.
Summary: Which knot for which situation?
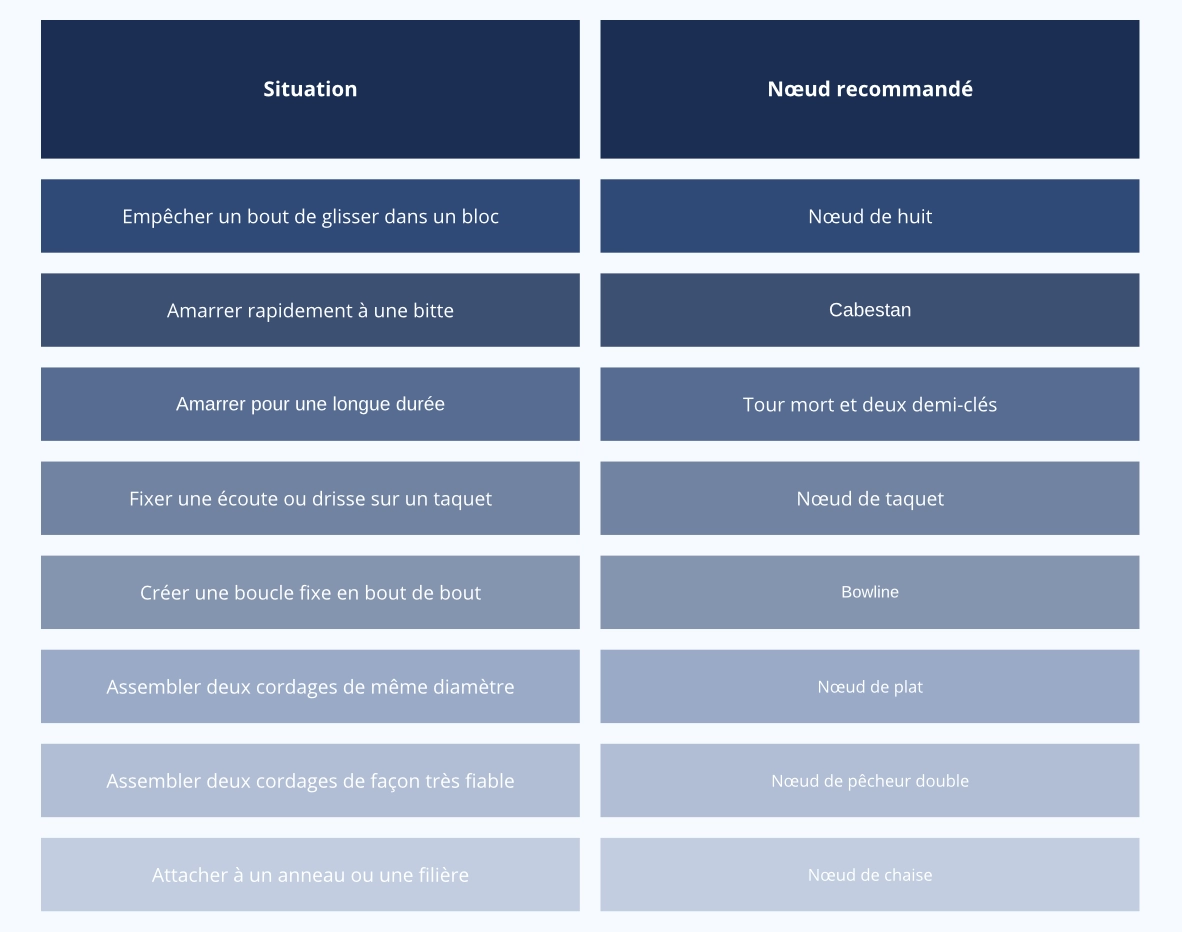
In summary
Nautical knots are not an obstacle to sailing — they are its foundation. Mastering them means gaining confidence on board, reacting quickly in emergencies, and taking care of your equipment.
You don't need to know fifty of them. By mastering the eight knots presented in this article, you'll cover the vast majority of needs for coastal and offshore navigation. The rest you'll acquire with experience, as you go on more trips.
So, grab your piece of rope, and start with the bowline. It truly deserves its nickname, 'the queen of knots'.
Published on May 21, 2026
Writer: Sophie Castelain

